
Wati: Connect with Your Customers on WhatsApp
Wati is a platform that uses the WhatsApp Business API to help businesses automate and manage conversations. It offers a no-code chatbot builder that allows you to create custom conversational flows.
8/22/20252 min read
Step 1: Accessing the Chatbot Builder
Log in to your Wati Dashboard.
Navigate to the Automations section from the menu.
Choose Chatbots from the options.
Step 2: Creating a New Chatbot
Click the "Create a new Chatbot" button.
You will be presented with an option to either use a pre-designed template or build a chatbot from scratch.
Templates: Wati offers various templates for different use cases, such as event registration, FAQs, product discovery, and more. If a template aligns with your goal, select it to save time.
Build from Scratch: If you want a completely custom flow, select the option to build from scratch.
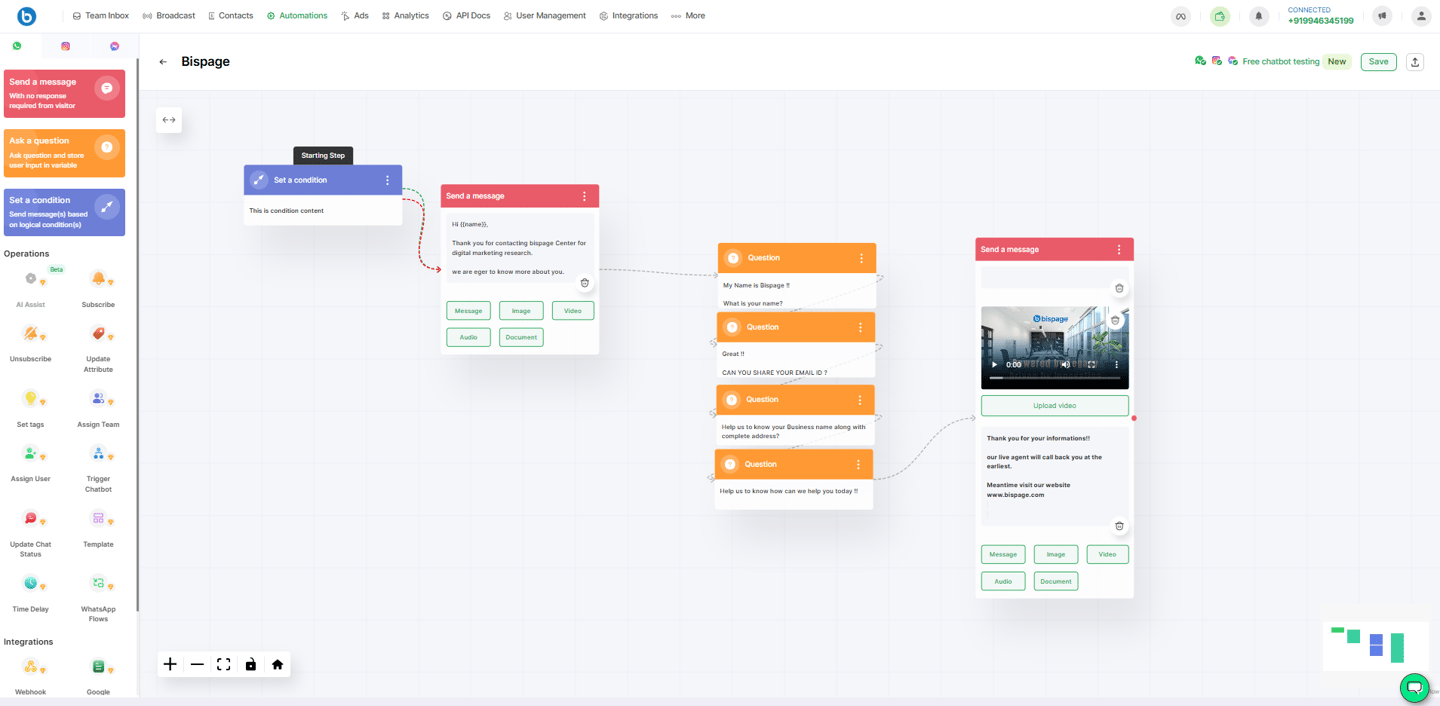
Step 3: Building the Chatbot Workflow (Flow Builder)
This is the core of the process, where you define the conversation flow using a visual, drag-and-drop interface.
Start the Flow: Your chatbot's first interaction is a crucial element. Start by adding a "Send a message" block. This will be the initial message your chatbot sends to a user.
Add Questions and Options:
Use the "Ask a question" section to create a conversational path.
Wati supports different question formats, including text, buttons, and list messages.
Enter your question in the designated box.
Connect the question block to subsequent blocks based on the user's potential answers.
Define Actions: As you build the flow, you can add various actions and operations that are triggered by a user's response. These can include:
Sending Messages: Send a follow-up message, a confirmation, or more information.
Interactive Elements: Include interactive buttons and list messages to guide the user's choices.
Data Collection: Collect user information and store it in a Google Spreadsheet or another integrated tool.
Assigning Tags: Tag contacts based on their responses to segment your audience.
Updating Attributes: Update contact attributes like language, location, or gender.
Assigning to Team: Route the conversation to a specific human agent or team based on the user's query.
Closing the Chat: Automatically close the chat once the flow is complete.
Webhooks: Pass data to a webhook to connect with other third-party applications.
Enrich the Chatbot: You can make your chatbot more engaging by adding videos, documents, and images within the conversational flow.
Save the Chatbot: Once you are satisfied with your chatbot's flow and logic, save it. You can also test the chatbot by scanning a QR code and sending a message to a test number.
Step 4: Configuring the Chatbot (Making it Live)
After creating the chatbot, you need to set up triggers to determine when it will be activated. You can do this in the Automations section.
Keyword Actions:
Set a keyword that, when sent by a customer, will trigger the chatbot.
You can set matching methods like "exact match," "fuzzy match," or "contains" depending on your needs.
In the next step, select the chatbot you created to be the response to that keyword.
Default Action:
You can set the chatbot as a "Default Action" to greet new customers or as a fallback message.
A fallback message is triggered when no keyword criteria are met.
Set Time Delays: You can also add time delays to your automation to send messages after a certain period of inactivity or as a follow-up.
Save Settings: Save your automation settings to make the chatbot live for your customers.
By following these steps, you can create and configure a sophisticated chatbot in Wati to automate sales, support, and marketing workflows on WhatsApp
